Description
This is the primary editing tool that you will use to create an email template; it is easy to use and allows quick addition and removal of sections, setting different colours for different areas, deciding on your campaign's font and width, testing and much more, all from a single window.
Why this is useful
This editing function allows users to create eye-catching email campaigns without writing code to accomplish any desired goal. With this tool, anyone can make a great email. The e-mail designer is now more flexible with moving sections, rearranging content, colour picker functionality, and content versioning. Here we'll explore everything related to our designer.
How to use the email designer
Here are some of this tool's features to get started and utilize to its full potential.
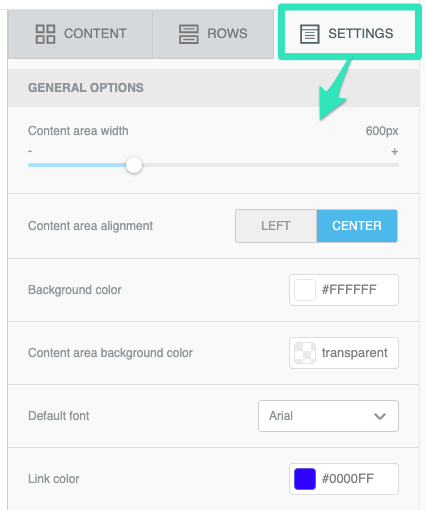
- Settings
This part is to set the tone for the entire campaign.
There are a lot of options for you to consider:
- Content area width (we recommend not going beyond 600 pixels)
- Content area alignment. (Left or Center)
- Background colour
- Content area background colour
- Default font
- Link colour
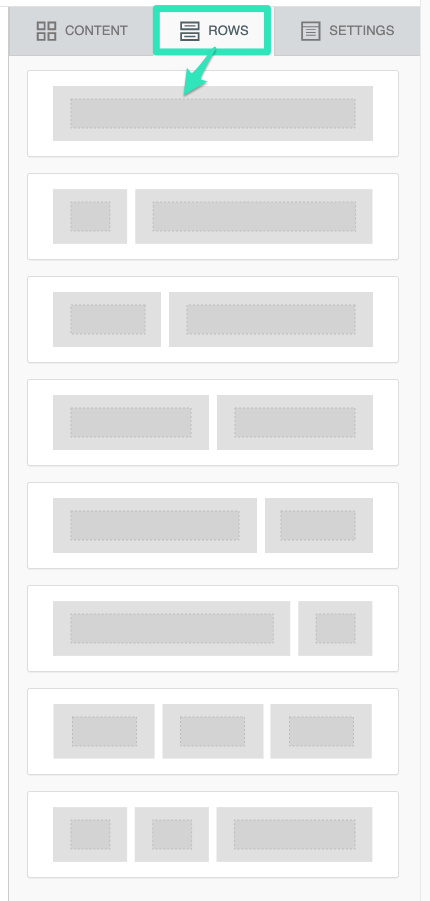
- Rows
Before adding any content to your campaign, you need to choose a row. The Rows section consists of a variety of component structures. Please select the one you want and drag it anywhere in the campaign. Test them and find the one that works best for your template.

- Move / Remove/ Duplicate row
Reposition, remove or duplicate a section of the email:
- First, select the row you need to reposition to access its repositioning menu.
To Move a section up or down within the template:
- In the positioning menu, click on the crossed arrows found on the left to move your selected row.

To remove a section:
- In the positioning menu, click on the trash icon on the right to delete the row.

To duplicate the row:
- In the positioning menu, click the double window button on the right, next to the trash icon.

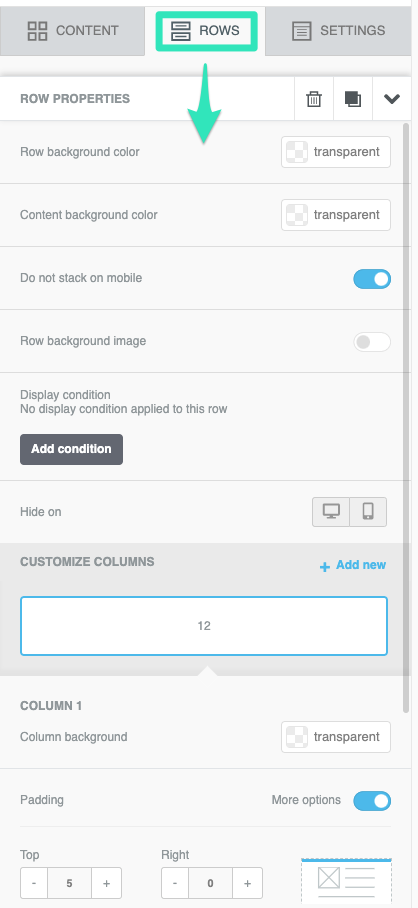
- Edit
Many items can be edited in the row section. Select the Row you wish to edit to access this menu on the right part of the designer.
Here are the features you can control:
- Row background colour
- Content background colour
- Do not stack on mobile
- Row background image
- Customize column
- Display condition
- Hide on Desktop/Mobile
- Customize columns
- Column background
- Padding
- Borders
- Content
Having decided what type of rows you want, you can now choose what content to include in those rows.
The following content options are available:
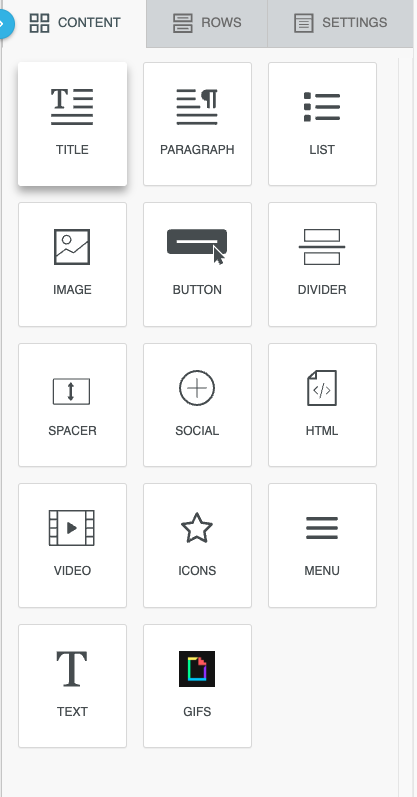
- Title: Use this to insert the title of your campaign.Paragraph: Use this to insert a paragraph of text.List: Use this to insert a list of different content.Image: Use this to insert an image you've uploaded or a stock image.Button: Use this to insert a call to action visible button.Divider: Use this to divide your content.Spacer: This block can insert space in your email content.Social: Insert the social media icons and link them to your pages. HTML: Insert your custom HTML code within the editor with this option.Video: Insert a thumbnail showing a preview of your video and linking to it.Menu: Use this to include an interactive menu within your email content.GIFS: Use this to include an animated gif in your email and choose from various options.
- Title: Use this to insert the title of your campaign.
- Paragraph: Use this to insert a paragraph of text.
- List: Use this to insert a list of different content.
- Image: Use this to insert an image you've uploaded or a stock image.
- Button: Use this to insert a call to action visible button.
- Divider: Use this to divide your content.
- Spacer: This block can insert space in your email content.
- Social: Insert the social media icons and link them to your pages.
- HTML: Insert your custom HTML code within the editor with this option.
- Video: Insert a thumbnail showing a preview of your video and linking to it.
- Menu: Use this to include an interactive menu within your email content.
- GIFS: Use this to include an animated gif in your email and choose from various options.
Each of them is editable within its block. Drag and drop the desired item into your email content section to use them. To create the perfect campaign, experiment with all the options within the designer. There is almost no limit to what this tool can do!
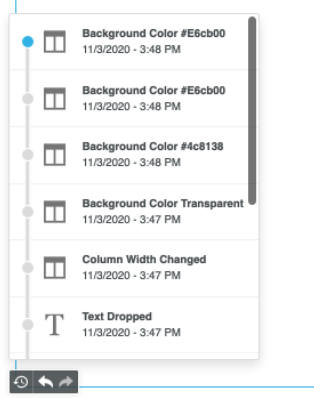
- Revert to a previous version of a campaign
An earlier version of your email can be restored. In the designer, click on the 'clock' icon on the bottom left of your campaign. You may then revert to a specific action within the edition.

- Preview mode
You can preview the site in desktop and mobile mode by clicking the Eye icon button found on the top right of the designer. Test your content on both platforms and make sure it looks good.

- Save changes to the campaign.

Always click the green Save button when making changes to your campaign in the email designer. It's better to be safe than sorry!
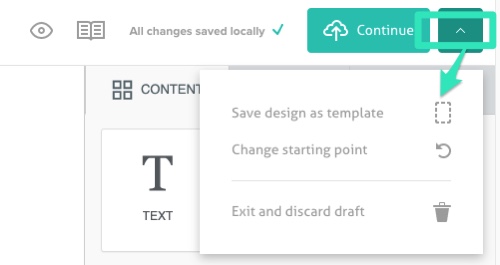
- Save the campaign as a template, reset or discard it
If you want to choose one of these options, click on the arrow button on the screen's top right.
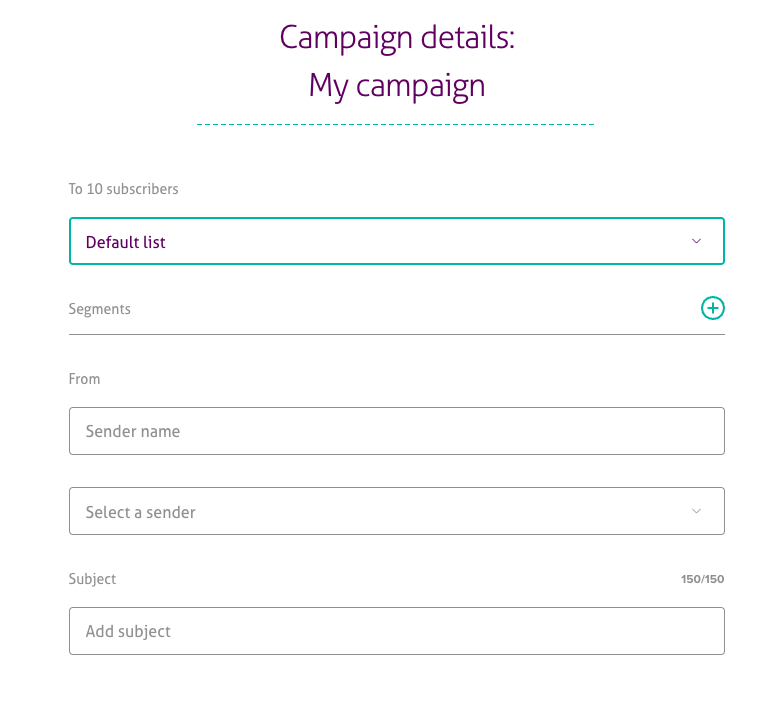
- Campaign details
If you are satisfied with your template and wish to send it, click on Continue in the designer's top right corner. The Campaign Details section provides you with these options for sending out the campaign.
You can set the following here:
- The name of your campaign
- The subscribers' list
- The segment within that audience,
- The sender's name
- The sender's email address
- The subject line
You can also review the campaign with an email test and program the delivery by selecting Send date and time.
Remember to test it thoroughly before mailing it. Here's a checklist of things to do before sending a campaign and after it's been sent out.